installation of submersible pumps
Get everything you need to know about installing a submersible pump
1. Topping up the motor
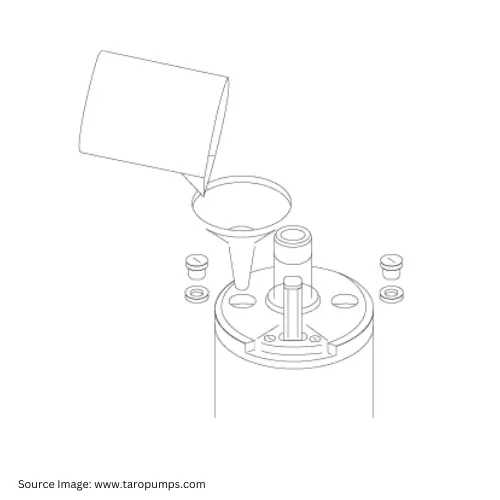
It comes pre-filled with a solution of clear, cold drinking water and anti-corrosive fluid for the submersible pump. Before installation, the following actions are taken:
- Place the motor on its base in a vertical position.
- Verify the tightness of each fastening. tighten if necessary.
- On the top and sides of the cable box, there are two threaded plugs that are given.
- Inspect the motor and top it off with clean, ice-cold drinking water as necessary.
- Gently rocking the motor back and forth removes any air bubbles that may have formed.
- Check the water level in the motor and add more cold, clean water if needed.
- The motor is then enclosed by reassembling the two threaded plugs.
- Dry the motor’s exterior and thoroughly inspect it for any leaks.
- The motor is ready if there is no leakage.
2. Waterproofing the submersible motor cable - supply cable joint
- A 3-core PVC-insulated flat cable with a 3 meter length is included with submersible motors.
- The supply cable from the control panel must be linked to the free end of the 3-core cable of the motor.
- The joint must be waterproof because it is frequently submerged in water.
3. Checking direction of rotation of motor
- Check to see that the motor shaft rotates in the same direction as the direction indicated on the visible cable box top face after waterproofing the connection connecting the submersible motor cable and supply cable.
- When viewed from the motor shaft end, as indicated on the cable box, the rotation is counterclockwise.
- Connect the cable’s free ends to the control panel, then turn on the motor for a few seconds.
- Pour clean water over the sand guard continuously to dissipate heat created for increased safety.
- Verify the motor shaft’s direction of rotation.
- The connections are secure if the rotational orientation matches the one shown on the cable box front.
- Replace any two lead wires at the control panel and validate as before if the three phase motor’s motor shaft’s direction of rotation does not match the marking on the cable box.
4. Checking of free rotation and play
Before coupling the pump set:
- Make that the pump and motor rotate freely.
- Make sure the pump and motor shafts move up and down.
5. Coupling submersible motor to pump
Follow these steps to connect the submersible motor and pump:
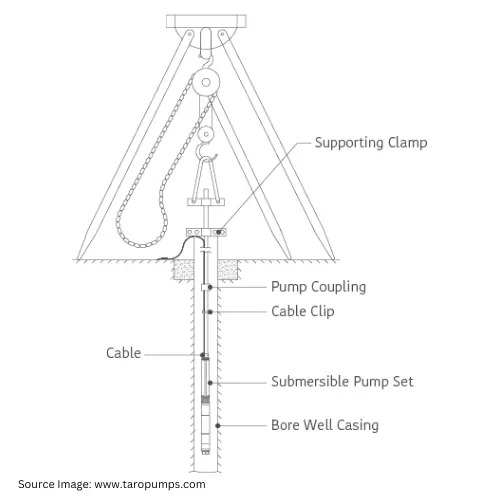
- The chain block and tripod are set up.
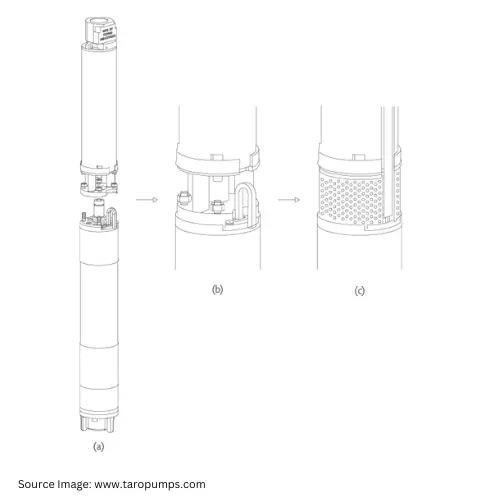
- Submersible pump should be disassembled along with the cable guard and strainer.
- Vertically position the submersible motor.
- Pump or motor shafts are fitted with couplings using grub screws.
- Apply threading compound to the delivery casing’s internal thread and the externally threaded section of the short delivery pipe that will be attached to the delivery casing.
- Attach the short delivery pipe with screws to the delivery casing.
- Lift the shaft to inspect the play in assembled condition.
- For some items, the coupling is installed on the motor shaft, while for the remainder, a grub screw is used to secure the coupling to the pump shaft.
- When using motors with the coupling mounted on the motor shaft, carefully lower the pump until the bottom face of the inlet bracket rests against the top housing.
- For pumps that have a coupling attached on their shaft, slowly lower the pump until the bottom face of the inlet bracket touches the top housing, making sure that the motor shaft is lined up with the coupling.
- Make sure that the inlet bracket’s face rests on the motor top housing and that the studs on the motor top housing should fit through the holes in the bottom half of the bracket.
- Tighten the intake bracket to the motor’s top housing using hexagonal nuts.
- By raising the coupling with the pump shaft, you may check the play.
- Verify that the assembled motor-pump may rotate freely.
- Last but not least, put the strainer and cable guard back in their proper places, making sure that the cable is protected by the Cable Guard.
- Install the pump at least 20 feet above the borewell’s floor.
Fit the supporting clamp to the delivery pipe and suspend the submersible pump from the chain block.(Check Out Submersible pumps by Epoch Automation )
6. Electrical installation
- From the Control Panel all the way up to the Submersible Pump, use a single cable.
- Submersible pump grounded
- As the cable joint is submerged in water, make sure the joint is waterproof.
- If the cable is longer than necessary, it cannot be coiled. Before making the connections, any extra should be trimmed off.
- To prevent loose connections, correctly attach the cable to the starter terminals.
- When choosing cable size, take low voltage operating into account.
Know more about submersible pumps and its benefits here.
7. Control panel
The following features should be included in the Control Panel of submersible pump:
- Adequate current rating contactors with an over-current relay.
- Protection against over- and under-voltage.
- Protection from phase failure.
- Dry run avoidance.
- Current and voltage are displayed by an ammeter and a voltmeter.
- Cable lead wire connection to starter.
For you all pumping solutions , contact us.


